To quantify the amount of mRNA, DNA, or cDNA in a sample, the use of nonspecific or sequence-specific fluorescent signals can be used in conjunction with RT-PCR. Sequence-specific detection (e.g. TaqMan®, Moeg;, Molecular Beacon, and Scorpion) use specially designed probes that have fluorophores bound to their 5′ end and quenchers bound to their 3′ end (Fig. 1). Fluorophores are molecules (or part of a molecule) that become excited in the presence of light and release fluorescence. The quencher is a molecule that extinguishes the fluorescence. When a qPCR reaction is ran using a specialized thermocycler (e.g. BioRad iCycler), the optical module of the thermocycler selects the correct wavelength of light and reflects it into the well where the PCR reaction mix is located. The fluorophore molecules become excited and fluoresce, and then the thermocycler's optical detection system measures and quantifies the amount of fluorescent emission present in each tube. For example: a TaqMan®-based experiment would require a fluorogenic probe along with the sequence specific primers to be added to the PCR reaction mixture. The probe is an oligonucleotide sequence, which is designed to hybridize to an internal region of the PCR product. It contains the fluorescent reporter dye (fluorophore) attached to its 5′ end and a quencher moiety attached to the 3′ end (Fig. 1). The fluorophore and quencher are separated by the length of the probe. The distance is close enough to allow the fluorescence from the quencher to block the fluorescent signal of the fluorophore. This prevents the detection of the fluorescent signal from the probe. During the annealing cycle, the probe will anneal to its target sequence in-between the forward and reverse primer. As long as the probe is intact, the fluorescence of the reporter dye is quenched; however, when DNA polymerase extends the primer and replicates the template on which the TaqMan® probe is bound, the exonuclease activity of the polymerase cleaves the probe, releasing the reporter molecule and allowing its fluorescence to be detected. The process is repeated during each cycle of the PCR, increasing the level of fluorescence as additional probes are cleaved. These types of detection are ideal for detecting single nucleotide polymorphisms or detection of specific sequences. The probes can be labeled with different reporter dyes allowing the user to detect more than one specific sequence in a sample (this is called a multiplex qPCR).
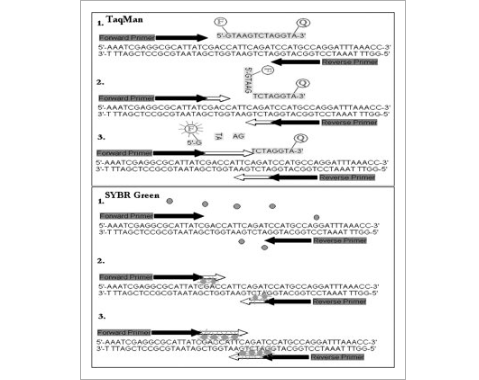
Figure1
TaqMan® and SYBR® Green Fluorescent Chemistries. TaqMan® (1) utilizes a probe which consists of an oligonucleotide sequence with a 5′ fluorescent reporter molecule (F) and a 3′ quencher dye (Q). As long as the probe is attached, the signal from the quencher dye (often a long wavelength colored dye) disrupts the signal of the fluorophore (usually a sholrt wavelength colored dye). Taq polymerase extends the primer (2) and replicates the template on which the TaqMan® probe is bound. The exonuclease activity of Taq polymerase (3) cleaves the probe, releasing the 5′ fluorophore (reporter dye) allowing fluorescence to occur. SYBR® Green intercalates dsDNA. When it is free in the reaction mix (1), it emits only small amounts of fluorescence. As primers are extended by Taq,polymerase, and replication of the template occurs, more SYBR® Green is intercalated into the replicated strand (2). Fluorescence increases as strands are replicated (3).
Basics of Primer Design
The success of a conventional PCR to perform at maximum is dependent on having a good starting template, a Taq polymerase and buffer solution that are good quality and designing primers which are well-balanced between two parameters: specificity and efficiency. Specificity is important because mispriming will occur when primers are poorly designed. This leads to nonspecific amplification of sequences found in the template pool. Efficiency is also important in primer design. An efficient primer pair will produce a twofold increase in amplicon for each cycle of the PCR. Most primer design software programs are preset with default parameters for conventional PCR. This allows for the selection of primer pairs that produce a respectable balance between specificity to the target sequence and maximum efficiency when used with a conventional PCR assay but are not necessarily the best primers for a qPCR.
In a SYBR® Green-based qPCR application, specificity is very important. To understand this, it is important to remember how SYBR® Green works. SYBR® Green dye will bind to any dsDNA present in the reaction mix, so amplification of nonspecific products produces data that is invalid. Other factors to consider are the formation of primer dimers and efficiency. Primer dimers may increase fluorescence, resulting in inaccurate quantification of the amplicon. Efficiency (how well the primers perform) of a qPCR reaction should be as high as 90–100%. Efficient primers increase sensitivity of quantification and allow for assay reproducibility. Factors that affect the efficiency of a qPCR include the amplicon length and primer quality. In short, the key to developing good SYBR® Green-based primers is to find a pair of primers that are very specific, do not produce primer dimers, produce short amplicons, and are efficient enough to produce results that are consistent and reproducible. Knowing the common parameters, which can be adjusted in most primer design software, can aid in achieving this.
Common Parameters of Primer Design
Primer Length
The optimal length of primers is generally accepted as 18–24 bp in length. Longer primers will take longer to hybridize, longer to extend, and longer to remove thus produces less amplicon.
Primer Melting Temperature (Tm)
This is the temperature at which 50% of the primer and its complement are hybridized. To optimize for qPCR find primers of minimal length which have melting temperatures (Tm) that are between 59 and 68 °C, with an optimal Tm of 63–64 °C. Also, the Tm of the primer pair should be within 1 °C of each other. The primers should also have a Tm which is higher than the Tm of any template secondary structures (found using mFOLD software, discussed later).
Annealing Temperature
Optimal real-time PCR annealing temperatures are 59 °C or 60 °C.
Product Size
An ideal amplicon should be between 80 and 150 bp. If multiple genes are used, (i.e. comparing the relative expression of several genes) then the size of all amplicons should be close in length. SYBR® Green detection will produce a more intense fluorescence in larger products than smaller (so keep multiple products close in length).
Mg++ Concentration
The default is set to zero on most primer design software. SYBR® Green buffer mixes contain 3 to 6 mM of MgCl2.
Repeats
A repeat is a nucleotide sequence (a dinucleotide) that is repeated (e.g.TCTCTCTCTC). These should be avoided because they promote mispriming. If unavoidable, the maximum number should be 4 di-nucleotides.
Runs
Runs are repeated nucleotides (e.g. TAAAAAGC has a 5 bp run of Adenine). Runs should also be avoided because they are prone to mispriming. The maximum run should be no more than 3–4 bp.
3′ Stability
This refers to the maximum ΔG of the 5 bases from the 3′ end of the primers. (ΔG is the Gibbs Free Energy, the energy required to break the bonds present at the 3′ end) A higher 3′ stability will improve the efficiency of the primer.
GC Clamp
This refers to the maximum ΔG of the 5 bases from the 5′ end of the primers. Often called a GC clamp, the 5′ stability refers to how stable the 5′ end is due to the amount of Gs or Cs present at the 5′ end of the primer. Having 1 to 2 GC clamps are ideal, as it allows the primer to bind strongly to the template strand, making it more specific, however; avoid more than 2 GC clamps.
Step-by-Step Example of Primer Design Using Primer3 Software
One of the most commonly used primer design software programs is Primer3 [7]. It can be used to design PCR primers, sequencing primers, and hybridization probes. Primer3 has many different input parameters which can be controlled to define characteristics that allow the software to design primers suitable for each goal. This section gives a step-by-step example of how to design primers using Primer3 and explains the functions of the most commonly used parameters. (Note: The following descriptions of Primer3 parameters are based on Primer3 website and may be verbatim in some cases.)
Step 1: Obtain Sequence in FASTA Format
Primer3 will accept sequences in FASTA, EMBL, and other formats. To explain the use of Primer3, a FASTA format sequence from the National Center for Biotechnology Information (NCBI) is used. NCBI is a government-funded, public database of genomic and other information relevant to biotechnology. (Note: The Populus trichocarpa (Poplar) dehydroquinate dehydratase/shikimate dehydrogenase (DHQD4) gene used in this example is NCBI accession number XM_002314438.1.)
Instruction: To obtain a copy of the DHQD4 gene sequence go to the National Center for Biotechnology Information (NCBI) website: http://www.ncbi.nlm.nih.gov/guide/.
-
From the dropdown menu (above the search box) select “Nucleotide.”
-
In the search box enter: XM_002314438.1. Click on “Search.”
-
When the results appear, click on “Display Settings” located at the top of the page (under the search bar, to the left, at the top of the page), select FASTA then click “apply.”
Optional: Open a Word document and copy the FASTA format sequence onto a blank sheet. This makes it easier to check the template for secondary structures later on in the experiment.
Step 2: Using Primer3
It looks intimidating but is easy to use once you become familiar with the search parameters. Primer3 software can be used to design primers for all types of PCR, so it has a multitude of options. After reading what the options do, students are instructed how to alter options to design primers for the DHQD4 gene.
Instruction: Go to the Primer3 website at: http://frodo. wi.mit.edu/primer3/
Copy and paste the DHQD4 FASTA format sequence from the Word document into the box provided on the Primer3 primer design page (Fig. 2).
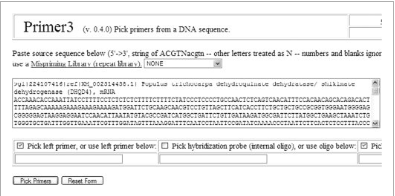
Figure2
Primer3 online software for primer selection.
Input DNA sequence in FASTA format in the nucleotide box. Above, Populus tricocarpa DHQD4 sequence has been entered. NCBI identifiers (shown above as >gi|224107416|ref…mRNA) can be entered prior to the sequence but are not necessary.
Pick Left Primer, or Use Left Primer Below: If this option is left blank, the Primer3 program will chose the left primer. If, however, a left (or forward) primer sequence is already known, and the user only needs to create a right (or reverse) primer, the known sequence would be entered in this box.
Instruction: For the Poplar example, leave it blank.
Pick hybridization probe: A probe (e.g. TaqMan®) is not required in SYBR® Green detection, so leave this blank. When using probe-based fluorescent detection, a probe would be designed along with the primer set. Checking this option allows Primer3 to provide alist of suggested probes which would work with the primer set.
Instruction: For the Poplar example, leave it blank.
Pick Right Primer, or Use Right Primer Below: If this option is left blank, the Primer3 program will chose the right primer. If, however, a right (or reverse) primer sequence is already known, and the user only needs to create a left (or forward) primer the known sequence would be entered in this box.
Instruction: For the Poplar example, leave it blank.
Sequence Id: A name for the primer set.
Instruction: For the Poplar example, enter the following name: Populus trichocarpa DHQD4.
Targets: If primers need to be designed for a “specific” location in the sequence, the user can use brackets to tell Primer3 where to design primers (e.g. AA[TAGC]ACC) would tell Primer3 to design primer around the TAGC base pairs). This choice is helpful if you want to design primers for a specific sequence area.
Instruction: For the Poplar example, skip this option.
Excluded Regions: This option is very helpful if a certain part of the sequence needs to be avoided. For instance, if oligodT primers are used to perform reverse transcription to create cDNA, the 5′ end of the mRNA (if it is very long sequence) could not be represented in the cDNA as the oligodT primer may fall off before reaching it. In this case, it is necessary to avoid designing primers along the 5′ end and instead target the 3′ end of the sequence. Also, this option is very helpful if Primer3 software gives multiple primers from the same location (that aren't satisfactory), or gives primers that create an amplicon that has a lot of secondary structures (more about that later, when we discuss mFold values). To avoid an area, enter the values as a comma separated list (e.g: 81,6 where 81 is the bp position you want Primer3 to start this command and 6 is how many bp following the nucleotide at position 81 it should avoid).
Instruction: For the Poplar example, leave blank.
Product Size Ranges: This is the size of your amplicon. An optimal amplicon would be ∼120 bp in length. Generally, amplicons of 80–200 bp are acceptable; however, longer amplicons give less efficient qPCR results because more SYBR® Green is incorporated.
Instruction: For the Poplar example:
Erase all numbers.
Enter: 80–150 100–200 (this tells Primer3 to first look for primers which will produce amplicons between 80 and 150 bp, then look for primers which will produce amplicons between 100 and 200 bp.
Number to Return: This is how many primer sets Primer3 will return. This number is up to the user's discretion.
Instruction: For the Poplar example, enter 10.
Max 3′ Stability: This refers to the maximum ΔG of the 5 bases from the 3′ end of the primers. (ΔG is the Gibbs Free Energy G—the energy required to break the bonds present at the 3′ end) Higher 3′ stability will improve the efficiency of the primer. The higher this number is, the more stable your 3′ end is. (Note: the user may need to alter this number to obtain suitable primers.) Often the balance between efficiency and specificity is made more difficult due to secondary structure formation.
Instruction: For the Poplar example leave value at 9 (to return more efficient primers).
Max Repeat Mispriming: Repeats (e.g. ATATATATA) can cause mispriming (the result of a primer bonding to an unintended template). Some eukaryotes (human, drosophila and mouse for instance) have repeated segments that are notorious for mispriming. Because this is common, databases (called libraries) of sequences known to cause mispriming have been created. This option allows Primer3 to avoid areas of known mispriming when designing primers. If qPCR primers are being designed for human, mouse, or fruit fly sequences, a library should be chosen first. To chose a library, check which species is being used from the drop-down window (above the sequence input box at the top of the page). Then enter the maximum value in the “Max repeat mispriming” box. This value is the maximum allowed weighted similarity of the individual (forward or reverse) primer to all known repeated nucleotides which cause mispriming. To reduce the likelihood of mispriming, leave the number at 12 or increase the number. As this experiment uses a Poplar tree sequence Primer3 will not have a mispriming library to access, so leave the value at 12. Some computer savvy users create their own code to allow Primer3 to access mispriming data bases which they have created, but this technology is above the scope of this experiment and will not be discussed.
Instruction: For the Poplar example, leave the value at 12.
Pair max repeat mispriming: This value is the maximum allowed weighted similarity of the primer pair (both forward and reverse) to all known repeated nucleotides which cause mispriming. To reduce the likelihood of mispriming, leave it at 24 or increase the number.
Instruction: For the Poplar example, leave the value at 24.
Max Template Mispriming: Mispriming is the result of a primer binding to an unintended template resulting in amplification. This option checks individual primers for the likelihood that they will misprime to another area on the sequence provided. Template mispriming should be avoided in qPCR, otherwise an amplicon mixture of the intended product and a nonspecific product will be produced during amplification. Leave the value at 12 or increase the number to reduce the likelihood of mispriming. (Note: when a SYBR® Green-based qPCR is run, a no template control (NTC) should be used, and the thermocycler should be programmed to generate a melt curve to detect secondary products. If additional peaks are present in the melt curve, but no amplicon is detected in the NTC, primers should be redesigned as these peaks indicate that nonspecific products are being amplified).
Instruction: For the Poplar example, leave the value at 12.
Pair Max Template Mispriming: This option checks primer pairs for the likelihood that they will misprime on the template provided. Leave it at 24 or increase the number to reduce the likelihood of mispriming.
Instruction: For the Poplar example, leave the value at 24.
General Primer Picking Conditions: These are general options the user can set to pick primers.
Primer Size: Specificity can be controlled by finding a balance between the length of the primer and the annealing temperature of the PCR. The optimal length of primers is generally accepted as 18–28 bp in length. If using probes (e.g. TaqMan®) in a multiplex PCR, increase this length up to 35 bp. To optimize for SYBR® Green qPCR find primers of minimal length which have melting temperatures (Tm) that are between 62 and 67 °C, with an optimal Tm of 63 °C.
Instruction: For minimum value, enter 20; for Optimum, enter 25, For Maximum, enter 28
Primer Tm: This is the temperature at which 50% of the primer and its template complement are hybridized. Try to design primers with melting temperatures between 62 and 67 °C, with an optimal Tm of 62 °C to 64 °C. The Tm difference between the forward and reverse primers should be no more than 1–2 °C.
Instruction: Minimum, enter 60, Optimum, enter 64, Maximum, enter 70
Maximum Tm Difference, enter 2
Table of Thermodynamic Parameters: Primer3 uses these formulas to calculate the melting temperature. The recommended value is SantaLucia1998.
Instruction: For the Poplar example, set to SantaLucia1998.
Product Tm: This is the temperature at which 50% of the amplicon is ssDNA. The temperature varies depending upon the GC content of the template. Ideally, a targeted area on the template would have a GC content of 50%.
Instruction: For the Poplar example, set optimal to 50.
Primer GC: This is the minimum and maxiumum percentage of guanine and cytosine (GC) allowed. The GC content of primers is used to determine the melting temperature of the primer, which can be used to predict the annealing temperature. The melting temperature of primers is generally 3 to 5° below the annealing temperature. Ideally, qPCR primers should anneal at 59–60 °C. (Note: Most SYBR® Green master mix solutions contain specific amounts of buffer (salt) and MgCl2, which alter the primer melting temperature.)
Instruction: For the Poplar example: Minimum 35, Optimum 65, Maximum = 80.
Max Self Complimentary: Primers should not be self-complementary or complementary to each other. Primers that are self complementary form self-dimers or hairpin structures. As SYBR® Green dye will interact with any double stranded DNA structure, this value should be set as low as possible. Initially, set the value to 2. If Primer3 does not give primer sets, increase the value in increments of 1 and resubmit—repeat as necessary.
Instruction: For the Poplar example, set the value to 4.
Max 3′ Self-Complimentary: As polymerases add bases at the 3′ end of the oligonucleotide, the 3′-ends of primers should not be complimentary to each other, as primer dimers will occur. Sometimes this cannot be avoided. However, pay particular attention to complementation between primers at 2 or more bases at the 3′ ends of the primers as these tend to form primers more readily (See Fig. 3). Set the value low (e.g. 2 or 3) and increase by increments of 1 if Primer3 does not supply a list of primers.
Instruction: For the Poplar example, set the value to 3.
Max #N: This is the maximum number of unknown bases which Primer3 could consider in making primers. Many genes, ESTs (Expressed Sequenced Tags) and cDNAs in NCBI's GeneBank contain unknown bases (N). The symbol N is given as a “place holder” when sequencing cannot determine the nucleotide (G,C,T or A) present at a certain location in the gene (or cDNA) sequence. To avoid nonspecific amplification, set this value to zero.
Instruction: For the Poplar example, set to 0
Max Poly-X: The maximum number of mononucleotide repeats to allow in the primer. Long mononucleotide repeats (e.g. AAAAAAA) can promote mispriming and should be avoided. As a general rule, runs of 3 or more Cs or Gs at the 3′ ends of primers should be avoided, as their presence may promote mispriming at C or C-rich sequences.
Instruction: For the Poplar example, set to this value to 3.
Inside Target Penalty and Outside Target Penalty: Used if the primer needs to be designed to overlap a region (e.g. gap junctions). “If the primer is part of a pair that spans a target and overlaps the target, then multiply this value times the number of nucleotide positions by which the primer overlaps the (unique) target to get the ‘position penalty’ (from the Primer3 website). This parameter allows Primer3 to include the overlap of the primer with the targeted area of the sequence as a term in the objective function.
Instruction: Default is ok.
First Base Index: This parameter tells Primer3 which programming index type the first base in the input sequence is. GenBank (NCBI) uses one-based indexing.
Instruction: Default is fine.
GC Clamp: Defines the specific numbers of Gs and Cs at the 3′ end of both the left and right primers. Although you want to place Gs or Cs on the 3′ ends of your primer, no more than 2–3 G's and C's should be in the last 5 bases at the 3′ end of the primer.
Instruction: Default of 0 is fine.
Conc. of monovalent cations: This is the millimolar concentration of KCl salt (most of the time) in the PCR. Leave at 50 μM, unless there is a reason you added more salt.
Instruction: Default is ok.
Salt Correction Formula. Factors such as ΔG and Tm affect PCR performance and alter the efficiency of primer pairs. As the Tm of a DNA sequence is dependent upon length, sequence, surrounding ionic environment, and pH of the environment, it is important to evaluate the thermodynamics of dissociation and association of the nucleotide strands during the PCR. Primer3 uses formulas that are based on the nearest neighbor model with salt correction. The SantaLucia 1998 salt formula is preferred by Primer3. This formula is designed to accommodate the salt correction independent of sequence but dependent on oligonucleotide length.
Instruction: For the Poplar sample, select SantaLucia 1998.
Conc. of Divalent Cations: This is the concentration of divalent salts (usually MgCl2+) present in the PCR mix. SYBR® Green mixes usually contain ∼3 mM.
Instruction: Change to 3.5 mM (to adjust for MgCl in SYBR Green Supermix)
Conc. of dNTPs: A dNTP concentration of 200 μM is usually recommended for Taq polymerase to function efficiently in a conventional PCR, where MgCl2 concentrations are 1.5 mM. Increases in dNTP concentrations can inhibit PCR reactions by trapping free Mg. Some SYBR® Green master mixes come prepared with taq, KCL, MgCl2, and dNTP already in the mix. These mixes have been laboratory tested to give maximum performance.
Instruction: For the Poplar example, use 0.20 mM
Annealing Oligo Concentration: Used to calculate the oligo melting temperature, this is the nanomolar concentration of annealing oligos in the PCR. As the value is dependent upon the amount of oligos and the amount of template, it is difficult to calculate this value (given cDNA is used as a template). Primer3 claims that the default (50 nM) works well for most applications.
Instruction: For the Poplar example, default is ok.
Objective Function Penalty Weights for Primers: The penalty weights section allows Primer3 users to modify the criteria that Primer3 uses to select the best sets of primers. If no penalty weights are assigned, the program will use the information that the user provided to the “General Primer Picking” specifications and grade each set of primers based on those conditions. Using penalty weights the user tells Primer3, “this criteria is more important than another.” Users enter penalty weights in values of 0, 1, 2, 3, etc. with 0 being less important. For instance, one might decide that primer dimers are a bigger concern than secondary amplicons. Then, the Self Complementary option could be set to 3 and Template Mispriming to 2. Some parameters have two boxes (Lt and Gt). This less than (Lt)/greater than (Gt) option allows for more flexibility in picking primers. For instance, if the user has specified under “General Primer Picking Conditions” that the primer size (Size) should be between 18 bp and 27 bp, any primers that are considered will be penalized if they are less than 18 bp, or greater than 27 bp. A user could give a penalty of 2 for primers shorter than 18 bp and a penalty of 0 for primers greater than 27 (if longer primers would be acceptable).
Instruction: For the Poplar example, change the following penalty weights:
Objective Function Penalty Weights for Primers:
Tm Lt = 1 Gt = 1
Size Lt =1 Gt =1
Self Complementary = 3
3′ Self Complementary = 3
#N's = 2
All other values = 0
Objective Function Penalty Weights for Primer Pairs:
Product Tm: Lt = 1; Gt =1
Tm Difference = 2
Any Complementary = 3
3′ complementary = 3
Primer Penalty weight = 1
All other values = 0
Step 3: Analyzing Primers
Once all of the Primer3 options have been set, Primer3 will deliver suggested primer pairs based on the options defined by the user (Fig. 2). (If no primers appear, check to make sure the options defined are entered correctly)
Instruction: Once all options are entered, press “Pick Primers.” The following primer set will be displayed:
Under the primer, the Poplar sequence is shown (see Fig. 4). The location of the primers within the sequence is indicated by >>>>>>> for the forward primer and <<<<<< for the reverse primer. The left primer starts at 282 bp, is 22 bp in length, has a melting temperature of 63.85 °C, and a GC% content of 50%. The maximum weighted score for “any” complementation (hairpins or self-primers) is 2.0, and 3′ complementary is 0.0. The amplicon (product) size is 105 bp, and the likelihood of the primer pairs forming complementation (primer dimers) is 3.0.

Figure3
Polymerases add bases at the 3′ end of oligonucleotides.
Primer structures should be examined to see if the top or bottom strand could be extended. Avoid 3′ bp matches greater than 2 bp in length. Avoid primers with predicted free energy more negative than −3.5 kcal/mol.
Avoid 3′ bp matches >2bp Example of acceptable self-dimer.
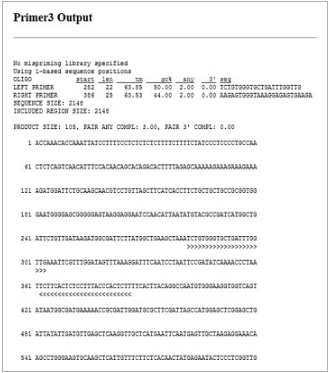
Figure4
Primer3 output page.
Left primer starts at bp 282 (indicated by >>>> within the sequence). Right primer starts at bp 386 (indicated by <<<<<< within the sequence). Left primer is 22 bp in length, has a melting temperature of 63.85 °C, and a GC% content of 50%. The maximum weighted score for “any” complementary is 2.0, and 3′ complementary is 0. The amplicon (product) size is 105 base pairs, the likelihood of the primer pairs forming complementation is 3, and 3′ complements is 0.
Instruction: Scroll down the page; located underneath the sequence are additional oligonucleotides. These are alternative primers that meet the user specified requirements.
Located at the bottom of the page is a “Statistics” section. This information tells the user how many primers were considered and gives the number of primers rejected. In this case, there were 10989 left primers considered, 3592 did not meet the requirements for GC%; 2585 had a low Tm; and 858 formed complementary structures that were unsuitable. This information is useful in determining which parameters have been set too stiff. For instance, if Primer3 does not return any primers, and the statistics show that a lot of primers were rejected due to GC%, then the user could return to the Primer3 input page and change the GC% settings.
Step 2. Beacon Designer™ Free Edition to Check for Primer Secondary Structures
All software (commercial or freeware) will produce primers which may or may not be optimal for qPCR. It is important to analyze the primers using an additional software program like Beacon Designer™ Free Edition.
Instruction: On the WWW, go to http://free.premierbiosoft.com. Click on “Beacon Designer [Free Edition]. Then click on “Launch Beacon Designer™ Free Edition.” Create a user name and log in to start using.
Click the SYBR® Green option and (using the first sequence Primer3 returned, shown above in Fig. 3) enter the left primer sequence in the box for “Sense Primer.” Enter the right primer sequence in the box for “Anti-sense Primer” (Fig. 5). Click Analyze. (Useful tip: double click on the primer sequence, use ctrl+C to copy, use Ctrl+V to paste).
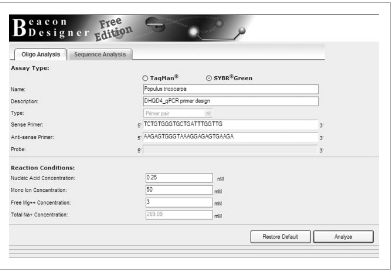
Figure5
Beacon Designer Free Edition software entry form.
Analysizes secondary structures formed between primers under qPCR conditions. Both SYBR® Green and TaqMan® primers (and probes) can be analyzed.
Beacon Designer Free Edition allows you to visualize the structures that can form between primers and primer pairs (Fig. 6). Cross Dimers are formed between forward and reverse primers; self-dimers form between two primers of the same type (e.g. forward primer to forward primer); and hairpins form when primers fold back onto each other. As a rule of thumb, never accept primers where the 3′ end has 3 bp matches, as these will tend to form primer dimers preferentially over hybridizing with the sequence (Fig. 3). If self-dimers or cross dimers cannot be avoided, chose primers with the highest −ΔG (meaning the least negative number—the one closest to zero). As a rule of thumb discard primers with ΔGs more negative than −3.5 kcal/mol. If hairpins cannot be avoided, steer clear of hairpins which involve a 3′ end, and use an mFold software to determine the melting temperature of the structure. The primer pair should not hold together at the annealing temperature (60 °C).
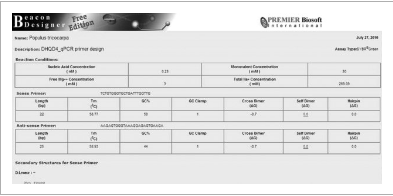
Figure 6
Beacon Designer Free Edition output.
Secondary structures are given for primers and primer pairs, along with the estimated Gibbs free energy required to break the bonds formed. The Poplar DHQDr qPCR primers shown above contain cross dimers with a ΔG of −0.7 kcal/mol, and 1 GC clamp, no other secondary structures are reported.
Instruction: Look at the table. Both the sense (left) and antisense (right) primer form cross dimers with a Gibbs free energy of −0.7 kcal/mol. Scroll down to see the structures. The first cross dimer has a 3 bp interaction on the 3′ end of the antisense (right) primer. This primer could be problematic (but has a very low ΔG, so ΔGbeen −1 or above, it would be advisable to reject this primer ding upon the location of the dimer.
Step 3. Using mFold Software to Check Amplicon Secondary Structures
Once the primers have been checked for secondary structures, it is important to also verify that the amplicon does not form secondary structures. This can be done using mFold software available online. Integrated DNA Technologies (IDT) has a free mFold software that works quite well. It can be found at: http://www.idtdna.com/Scitools/Applications/mFold/.
Instruction: Find the location of your forward and reverse primer within the Poplar sequence (Fig. 7). (Tip: Use a MS Word document to paste your sequence. Use Ctrl+F to open the find box. Copy and paste the forward sequence in the box and hit “find next.” Highlight the sequence (Fig. 7). To find reverse primer you will need to reverse the sequence and substitute complements, i.e. the primer
→AAGAGTGGGTAAAGGAGAGTGAAGA will match ←TCTTCACTCTCCTTTACCCACTCTT in the sequence)
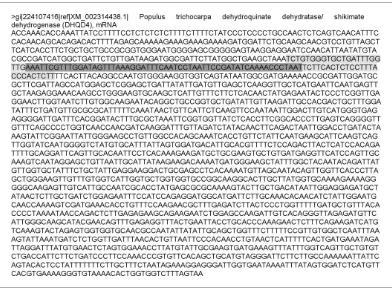
Figure7
Location of primers and amplicon in sequence.
Above, highlighted in light gray and dark gray is the amplicon (amplicon includes both forward and reverse primer).
Go to: http://www.idtdna.com/Scitools/Applications/mFold/. Copy the amplicon (include both forward and reverse primers) into the sequence box. Change the temperature to 60 °C, and the magnesium concentration to 3 mM. Click “submit.”
Any structures which will form are shown. All amplicon secondary structures should have a lower melting temperature (Tm) than the qPCR annealing temperature (normally 60 °C). Notice that the Poplar amplicon forms a structure with a Tm of 62.9 °C (Fig. 8). This is unacceptable, evaluate other primers.
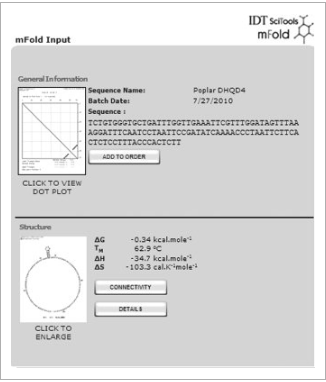
Figure 8
mFold software for secondary structure analysis.
Dot plot and structural analysis of secondary structures which may form between nucleotides of Poplar amplicon under qPCR conditions. A hairpin loop structure which has a melting temperature of 62.9 °C. This is above the annealing temperature for qPCR and is unacceptable.
Evaluation of Other Primers: When evaluating primers, if any of the following occurs: (1) primer dimers or hairpins are found (which have very low −ΔG values (e.g. −4.0, −5.0, −6.0, etc.), (2) 3′ hairpins are found, (3) mFold results show secondary structures of the amplicon which are above the annealing temperature, it is necessary to analyze other primer sets. Primer3 software (by default) gives 5 sets of primers. If all 5 primers amplify the same section of DNA (they all start or end around the same bp in the sequence) and an mFold value was the problem, it is pointless to analyze these primers. Instead, Primer3 can be directed to exclude this area of the sequence (using the “exluded regions” parameter discussed above). If desirable primers are not found, change Primer3 options and/or objective penalty weights.
Instruction: Return to Primer3 input page and change the following:
Find the “Excluded regions” option and insert 237,6 280,6 (this tells Primer3 to avoid making primers around bp 237 and the next 6 base pairs, and 280 and the next 6 bp.
Under primer picking conditions: Find the Max Self Complementary option and change 4 to 3.
Change the following objective function penalty weights: Product Tm: Lt = from 1 to 0; Gt = from 1 to 0
Click “Pick Primers.” The following primer set is suggested:
Instruction: Analyze the primers using Beacon Designer™ Free Edition. Do primer dimers, self-dimers, or hairpins exist? Are ΔG values less than −2 kcal/mol? Do dimers form at 3′ ends?
Analyze the amplicon and any primers which may have formed hairpins with mFold. Do all secondary structures have melting temperatures less than 60 °C? Are these are good primers?
Step 4. Blast Primers to Check for Specificity to Nonspecific Sequences
Primer3 checks the primers for the ability to nonspecifically bind to another location within the sequence. However, most gene expression assays contain cDNA made from total RNA collected from tissue (e.g. leaf or liver). It is necessary to verify that the primers do not hybridize with another gene. This can be done by comparing the primer sequences to known gene databases at NCBI, using the BLAST option.
Instruction: Go to the NCBI website: http://www. ncbi.nlm.nih.gov/
On the right hand side of the page (under Popular Resources), find and click on “BLAST.” (BLAST or Basic Local Alignment Search Tools is a search option which allows users to find regions of similarity between biological sequences).
Under the heading “Basic BLAST” find and click on “nucleotide blast.” (This option allows users to search multiple nucleotide databases)
Enter the forward primer, space (or return) and enter the reverse primer sequence in the “query sequence” box.
Under the heading “Choose Search Set,” click the option (circle) for “Others (nr etc).” Next type Populus tricocarpa in the box beside Organism (when you start typing a drop down menu will appear and you can select Populus tricocarpa (taxid:3694) from it).
Now click “BLAST.” The search engine automatically adjusts to search for short input sequences and returns matches. Check for “query coverages” equal to 100%. If other genes are suspected of being falsely amplified, redesign primers. (Note: In our case, only the shikimate dehydratase and a draft sequence of Populus trichocarpa appear. BLAST alignment shows a 99% identity, with 0 gaps to the draft sequence indicating a high probability that they are one in the same.)
Additional Advice: When designing primers:
Being familiar with the basics of primer design makes designing primers easier.
If no suitable primers are found, use the “statistics” section of Primer3 to see which options can be changed, without creating primer dimers.
If mFold values are above the annealing temperature. Analyze 200 bp sections of the nucleotide in mFold to find an area that does not form problematic secondary structures and design primers around this area using the “Targets” or “Excluded regions” options in Primer3.
Realize that no primer design program is flawless, even the most expensive, commercial program.
Short nucleotide sequences (<450 bp) and sequences with high GC content are more difficult to design SYBR® Green-based primers.

